Saturday 15 November 2008

Apples!


Image 1; f7.1, 6", iso100, 105mm

I've been reading through "Photography, A concise history" and found a few images in there that really interest me. One was of an apple named, "untitled" or "Galaxy Apple" by Paul Caponigro 1972 (page 227, plate 125). Initially it looks like a really simple shot. When you look closer and then go and try it out, its a different story. His exposure is just spot on. The lighting and reflections are just enough to show you the apple is three dimensional and round and shiny, but still allows for the varying shades and bright spots to be in perfect balance. The spots have a really nice patter as they spread out over the skin from the cores centres. The background is lit either side to pick the apple out really nicely to, or maybe from behind?

So I decided to try this out. I really can't put into words how hard this has been. The end results are nowhere near as good as the ones Paul Caponigro produced but I had fun doing it and they let me play around with candles and a flash and other different lights to try and achieve the same sort of results as the original.
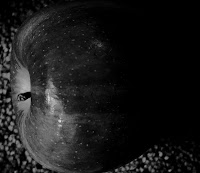

Image 2; f20, 25", iso400, 105mm
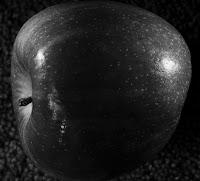
Image 3; f20, 25", iso400, 105mm

Image 4; f20, 30", iso400, 105mm

After looking at the images a little closer I wanted to play around with the image 4. It had a much smaller aperture and long exposure (f20, 30", iso400, 105mm) so the whole image is sharper and has more detail, this helped show more variation in the tones of the skin also. I did a little retouching to this, dropping a hair, dulling down the reflection and changing the levels to up the contrast.


Image 4; f20, 30", iso400, 105mm (retouched)

I felt this image is technically closer to the original, with the sharp edge to the apple, the background lit slightly to help bring the edges out. But the first image has a nice feel to it with the shallow DoF. it also looks a lot shinier. I'd taken time to block most of the light in the room so the highlights were less harsh in image 1 and I think it works well.

Also I found a 1:1 crop (square crop) worked best in my opinion, though my apple was very round rather than the oval one in the original by Paul Caponigro.

All in all I'm happy with the project! It also went very well with some cheese once I'd finished!

Tuesday 11 November 2008

TAoP Project 3

Here are the images for project 3. This was to show the depth of field (from this point on I will refer to this as DOF) using different apertures. I've shot in B&W as it made it a little easer to see the effects of the aperture changes. Also I used a tripod and manual focus so I could ensure the same crop and focus point (the centre beam) each time.

Shot 1: f2.8, 1/4, iso400, 125mm

This showed a really narrow band of sharpness.

Shot 2: f8, 2", iso400, 125mm

A slightly larger band of sharpness.

Shot3: f16, 8", iso400, 125mm

Nearly all of the image is in focus but it still has a slight blur to the far edges.

Shot4: f32, 30", iso400, 125mm

Everything in focus, though at the cost of a 30 second shutter speed.

Here are the images again with the area of sharpness mapped out. running from f2.8-f32:


As I've mentioned before (project 2), the overall extremeness of the effects of these aperture changes change with the size/angle of lens and distance from the subject. The closer you are/tighter you focus the more dramatic the effect of the large aperture and small DOF. I'd like to look at this further to gain a greater understanding of how this works. I understand that setting a low f stop will give me a nice sense of depth and a hight f stop an overall sharp image, but I'm not entirely sure of the science behind it, yet! Hopefully this will come with practice or maybe further on in the course...

TAoP Project 2 cont...

I decided to try another 3 shots for this.... All shots were f2.8, 1/60, 70mm, iso1000

I like the first shot as again it has an obvious depth of field before and after the gravestone I've focused on. The others work fine but I found the textures on the 2nd gravestone away from you was the nicest. I noticed that because I was further away from the subject the area in focus at f2.8 was greater than on the lolly pop images (showing off the litchen and moss). The effect is a lot subtler but still draws the viewer to were you want them.

TAoP Project 2

So for this project I've taken some close ups of a lolly pop stand.
I found this was the best subject to hand to show the depth of field.


All shots were f2.8, 1/60, 105mm, iso250. In sequence I focused on a row at the top, a row in the middle and a row at the bottom. This close up showed me the depth of field very clearly (I'd had problems using a wide angled lens on distant subjects). I decided to try a different crop and orientation to see how it looked...

I much preferred this image as it showed the depth of field before and after the lolly pop that was in focus. This seems to have a better impact on this particular shot, especial as you can almost read the logo. When you zoom in on the image (click on it now!) you can just make out a band of in-focus dots in the wrappers print. I really needed a slightly smaller aperture to allow for the whole face of the lolly pop to be in focus, at f2.8 it's far to small an area.

As I mentioned, I'd encountered problems showing an obvious depth of field whilst either using a wide lens or distant subjects. When I zoomed in or got closer the effects of a large/wide aperture was a lot more effective... More on this in Project 3.

I've also noticed my images are looking a little dull and de saturated once uploaded... I'll need to look in to this. I'm guessing it's my new Adobe CS4 that need calibrating.

Thursday 6 November 2008

TAoP Project 1

So here's the 3 images for project one!


The first image is at 12mm, second at 70mm and the third at 200mm
It was interesting to find that 70mm is almost exactly the same as your own eyes view.

I also found that 70mm with one lens was slightly different from 70mm on another. This change of lens also showed me there was a considerable difference in the light coming through these lenses (28-70 f2 and a 70-200 f2) I suppose looking at them there would be an obvious difference as one's compact and the other is huge. I'd just never thought about it before.

I'm awaiting the prints for these to see how that side works... I'm interested to see the optimum viewing point of the images produced.

I have to say that initially I'd thought this project would be a waste of time but inevitably I found a few things out about the lenses I have that I wouldn't have found otherwise. The 70-200 lens seems to produce an image with more contrast which is really nice when you shoot on a hi iso speed. I've attached an image of a brick wall that's got a really nice feel to (in my opinion) from this lens. It's had a little colour work in Photoshop but not to much. just a slow shutter speed and big aperture with a grainy fast ISO.